
Payroll Support Document
Open as: PDF or Word Document
5. After the Fact Payroll
Table of Contents

Click on "5. After the fact payroll" from the Main Menu and the following window will appear:
After the Fact Payroll
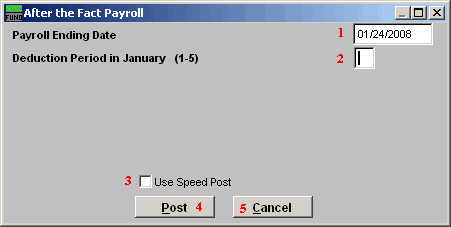
- Payroll Ending Date: Enter the ending date of the payroll period for which the check was issued.
- Deduction Period in January (1-5): Enter the deduction period for which the check was issued. Periods 1 through 5 represent each week in a weekly payroll cycle.
- Use Speed Post: If you turned on "Use New Posting Screen" in the "General" tab of "I. Installation" off the Main Menu, then this option will appear. If you check this off, all pay types for an employee will appear in the Post screen. The pay types that are not set as Autopost will NOT have quantities or rates. The pay types that you leave as zero values will be removed from this posting automatically. As you scroll over "Use Speed Post" with your mouse, the following description will appear in the upper right corner of your screen:

- Post: Click "Post" to create this post, the below window will appear.
- Cancel: Click on "Cancel" to cancel and return to the Main Menu.
Post: Normal Screen
If you do NOT have "
Use New Posting Screen" turned on in the "General" tab of "I. Installation" off the Main Menu, then the following window will appear after you click "Post."
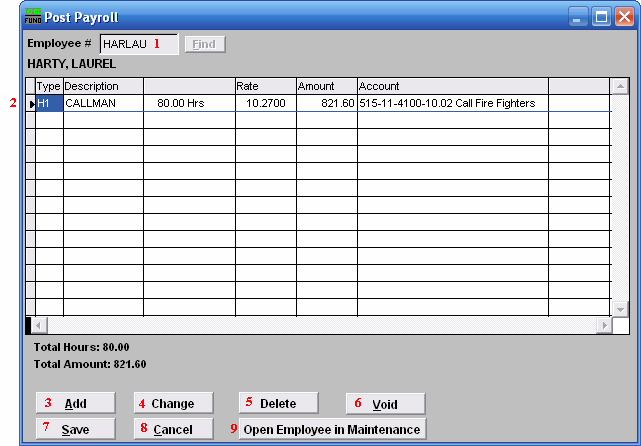
- Employee #: Select the Employee # for the Employee you are editing Payroll for.
- Selector: This shows you which Paytype you have selected. This is the Paytype that you will affect if you choose "Change" or "Delete."
- Add: Click this button to add a new paytype or deduction to this pay period.
- Change: Click this button to change the selected line from the table above.
- Delete: Click this button to remove the selected line from the table above.
- Void: Click this button to void the selected Paytype for this employee.
- Save: Click "Save" to save this posting, you will need to enter the check date and the check number, then you will return to the previous screen.
- Cancel: Click "Cancel" to cancel and return to the Main Menu. This will not save the postings in the table above.
- Open Employee in Maintenance: Click here to open this Employee in the "Employee Maintenance" screens. If you click "OK" or "Cancel" in these screens you will return to this screen.
Post: New Screen:
If you turned on "Use New Posting Screen" in the "General" tab of "I. Installation" off the Main Menu, then the following window will appear after you click "Post."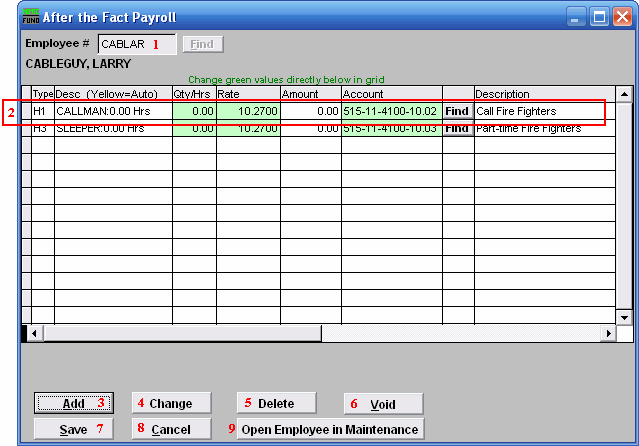
- Employee #: Select the Employee # for the Employee you are editing Payroll for.
- Selector: The paytypes and deductions that have been set up to automatically post will appear in this list. Click on any line to take action using item 3 or 4. You may change information that appears in green for a pay type by clicking on the grid. The pay types that appear in yellow are the paytypes that are set to Autopost. If you chose "Time Card" or have "Track Labor Costing" turned on then you may need to scroll to the right to view/edit more fields. You may turn on "Track Labor costing" through "I. Installation" off the Main Menu.
- Add: Click "Add" to add a new Paytype.
- Change: Click this button to change the selected line from the table above. You may also change the information directly on the grid. Refer to item 2 Selector for more information.
- Delete: Click "Delete" to delete the selected Paytype.
- Void: Click "Void" to void the selected Paytype.
- Save: Click "Save" to save this posting, you will need to enter the check date and the check number, then you will return to the previous screen.
- Cancel: Click "Cancel" to cancel and return to the Main Menu.
- Open Employee in Maintenance: Click here to open this Employee in the "Employee Maintenance" screens. If you click "OK" or "Cancel" in these screens you will return to this screen.
Add
If you click "Add," the following window will appear:
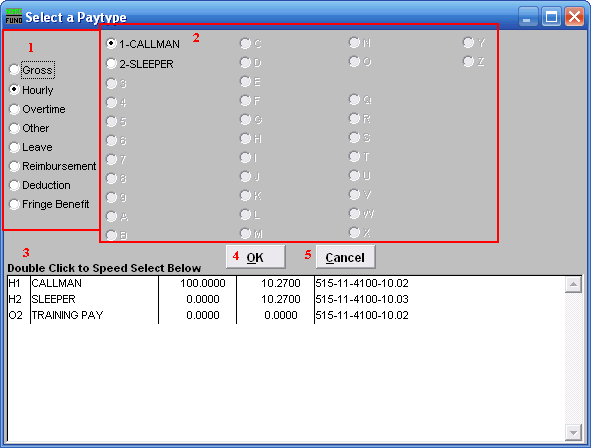
- If you chose "Add," click to choose what type of Paytype this is going to be.
- If you chose "Add," choose the number/letter that will be used for this Paytype code.
- Double Click to Speed Select: Double click on a pre-existing Paytype to choose it.
- OK: Click "OK" to save changes and return to the previous screen.
- Cancel: Click "Cancel" to cancel and return to the Main Menu.
Change
If you click "Change," the following window will appear:
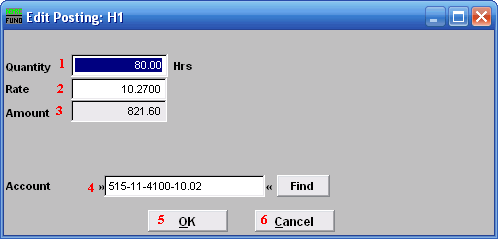
- Quantity: Enter the number of hours to record for hourly paytypes.
- Rate: Enter the hourly rate for this paytype.
- Amount: The amount field will automatically calculate.
- Account: The reference account for this paytype can be altered during posting. The default account is stored in Employee Maintenance.
- OK: Click "OK" to save changes and return to the previous screen.
- Cancel: Click "Cancel" to cancel and return to the Main Menu.
