
Accounts Payable Support Document
Open as: PDF or Word Document
2. Print Checks
Table of Contents
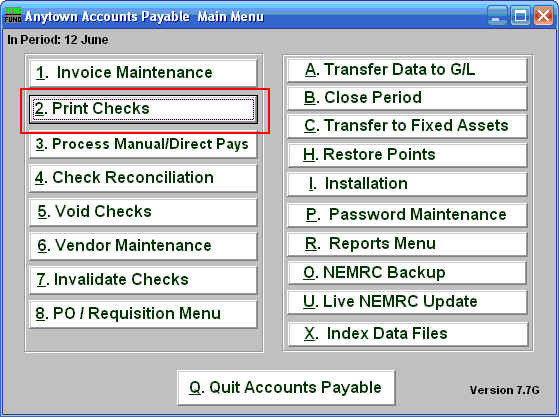
Click on "2. Print Checks" from the Main Menu and the following window will appear:

You should choose "Yes" when this notice appears. It is always very important that you backup your data. Keep in mind that this only backs up the data for the module and entity that you are in. Keep in mind that Restore Points are not a substitute for the regular backup routine.
After the Restore Point is made, the following window will appear:
Print Checks
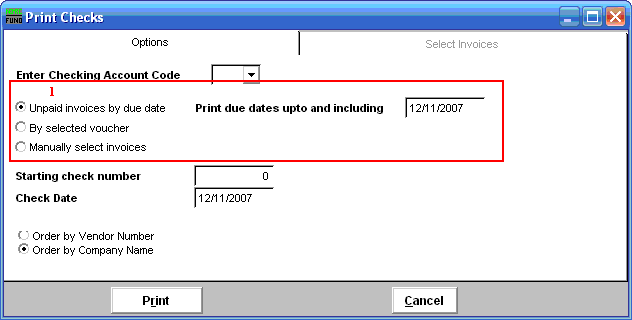
- Choose what you want to print checks by. Refer to the section below that relates to your choice.
Unpaid invoices by Due Date

- Enter Checking Account Code: Type in the Checking Account Code or select it from the drop down list.
- Print due dates upto and including: Enter in the due date for which you wish to pay, including any invoices due before that date.
- Starting check number: Type in the check number to start with.
- Check Date: Enter in the date to appear on the checks.
- Order by Vendor Number OR Order by Company Name: Select in which order you want the checks to be printed.
- Print: Click this button to print the checks. Refer to GENERAL PRINTING for more information.
- Cancel: Click "Cancel" to cancel and return to the Main Menu.
By Selected Voucher
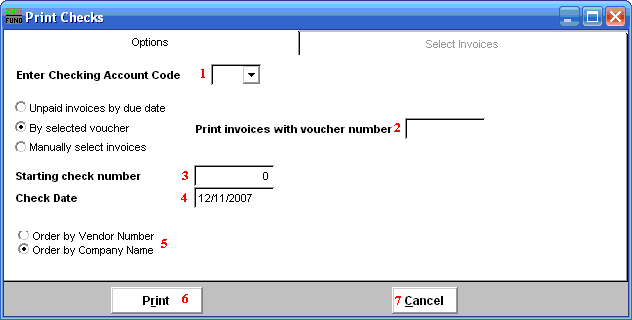
- Enter Checking Account Code: Type in the Checking Account Code or select it from the drop down list.
- Print invoices with voucher number: Enter the voucher number you wish to use. The system will process all unpaid invoices that reference the value provided.
- Starting check number: Type in the check number to start with.
- Check Date: Enter in the date to appear on the checks.
- Order by Vendor Number OR Order by Company Name: Select in which order you want the checks to be printed.
- Print: Click this button to print the checks. Refer to GENERAL PRINTING for more information.
- Cancel: Click "Cancel" to cancel and return to the Main Menu.
Manually Select Invoices
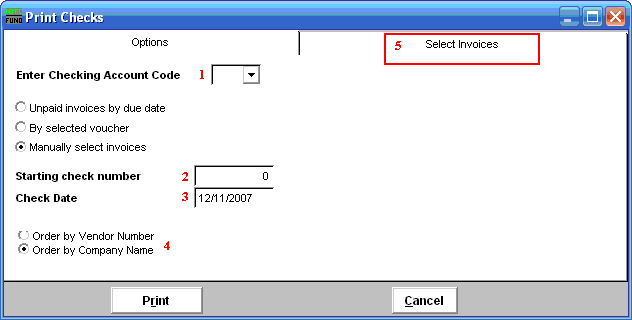
- Enter Checking Account Code: Type in the Checking Account Code or select it from the drop down list.
- Starting check number: Type in the check number to start with.
- Check Date: Enter in the date to appear on the checks.
- Order by Vendor Number OR Order by Company Name: Select in which order you want the checks to be printed.
- Select Invoices: Click on this tab and the following window will appear.
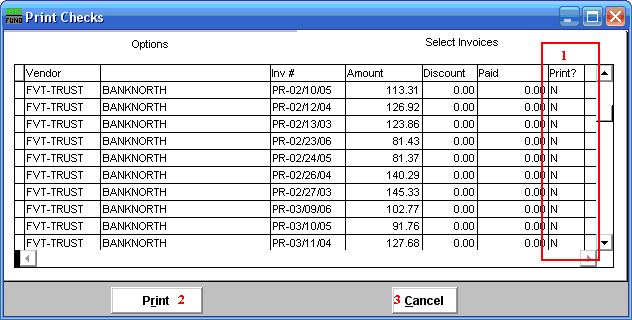
- Print?: Click on this column in the row of an invoice you wish to print, and type "Y."
- Print: Click "Print" to print checks.
- Cancel: Click "Cancel" to cancel and return to the Main Menu.
