
NEMRC System FAQ
Open as: PDF or Word Document
Backing up NEMRC data
NEMRC data is valuable. It should be backed up often and in some cases stored in a safe place for years to come. With this in mind, NEMRC has developed a Windows based tool to help you facilitate backing up your data. In this document we will describe how to setup the NEMBACK tool.
NEMBACK is built into all Windows programs as "O. NEMRC Live Backup" on the main menu and is very easy to use. Please keep in mind that backing up data through a module will only backup data for that module and entity from which it is chosen.
The tool referred to as NEMBACK, has the abilities to backup data to:
- A folder called backup on your NEMRC drive
- A floppy disk (or multiple floppy disks)
- Through the internet to NEMRC's server. A $5.00 fee will apply unless you have a Disaster Recovery Agreement (DRA) with NEMRC.
- A folder you specify including CD-R/CD-RW drives
It is important to test your backup process. You should check your backups to make sure that you have successfully backed the data up, as well as to make sure that you can actually restore and use the data.
Table of Contents
Backing up Data
Backing up Data
Through a Module
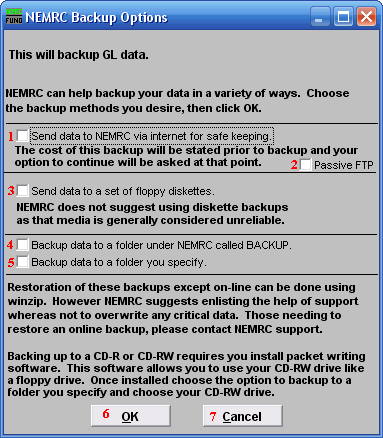
From the main menu of the module you are in, click "O. NEMRC Live Backup" and the following window will appear:
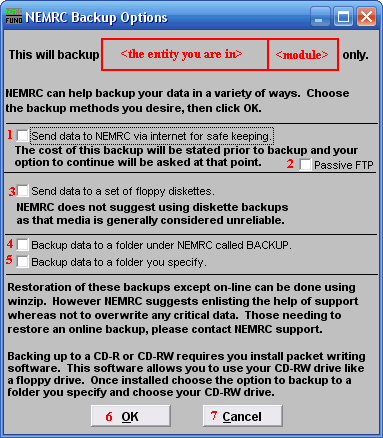
- To NEMRC via internet : Compresses data selection from above and transfers the file to the NEMRC WEB server through your internet connection.
- Passive FTP : Check this option when consistent failures to backup occur, this alters the method to allow more time to perform the task.
- Floppy diskettes : Traditional backups of this type are an un-reliable option, but is okay if its the only option at the time. The backup will span multiple diskettes if needed.
- NEMRC folder>Backup : This option creates a unique file in a sub-folder of NEMRC. This data will not be recoverable if the hardware device fails due to the live data and backup data being on the same device.
- Folder you specify : This option allows you to navigate to a different location on the same device or a different device to save your backup. Thumb drives are often used as well as re-writable CD's or DVD's.
- OK : This will start the process from the selection choice made above.
- Cancel : This will exit the backup options and not perform a backup.
All Data
Go to the Start Menu. Choose "Run." Type the location of the NEMRC programs (most commonly "c:\nemrc\") then type "nemback.exe" (Note that many towns have NEMRC running on a server - as in N:\nemrc. If so, use the drive letter and directory for NEMRC on the server)
So you should have:
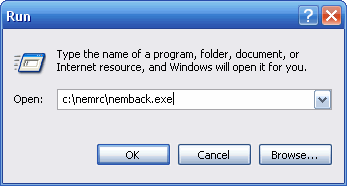
Choose "OK." The following window will appear:
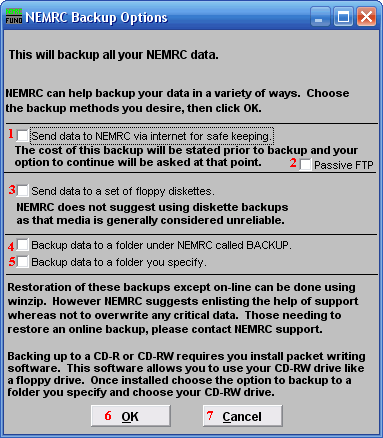
- To NEMRC via internet : Compresses data selection from above and transfers the file to the NEMRC WEB server through your internet connection. < li>Passive FTP : Check this option when consistent failures to backup occur, this alters the method to allow more time to perform the task.
- Floppy diskettes : Traditional backups of this type are an un-reliable option, but is okay if its the only option at the time. The backup will span multiple diskettes if needed.
- NEMRC folder>Backup : This option creates a unique file in a sub-folder of NEMRC. This data will not be recoverable if the hardware device fails due to the live data and backup data being on the same device.
- Folder you specify : This option allows you to navigate to a different location on the same device or a different device to save your backup. Thumb drives are often used as well as re-writable CD's or DVD's.
- OK : This will start the process from the selection choice made above.
- Cancel : This will exit the backup options and not perform a backup.
If done correctly, you should receive a message stating that your backup was a success.
One Module
To backup all of your data for one module, without opening the module:
Go to the Start Menu. Choose "Run." Type the location of the NEMRC programs (most commonly "c:\nemrc\") then type "nemback.exe" and then type a space, followed by "N N N" and then the two letters representing the module. This is case sensitive; you MUST use capitals. (Note that many towns have NEMRC running on a server - as in N:\nemrc. If so, use the drive letter and directory for NEMRC on the server)
So you should have:
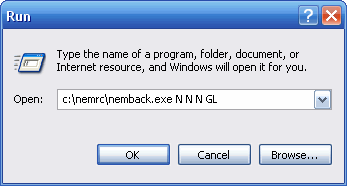
Choose "OK." The following window will appear:
The following is a list of Modules, and their shortened term; this is also the order to open the applications after you perform a Live NEMRC Update.
| Module | Term |
|---|---|
| General Ledger | GL |
| Accounts Payable | AP |
| Payroll | PR |
| Tax Administration | TA |
| Accounts Receivables | AP |
| Utility Billing | UB |
| Cash receipts | CR |
| Voters Checklist | VT |
| Animal Licensing | DG |
| Land Records | LR |
| Grand List | LS |
| Fixed Assets | AS |
| Human Resource | HO |
| Vitals Marriage | VM |
| Vitals Death | VD |
| Cemetery GL | CM |
- To NEMRC via internet : Compresses data selection from above and transfers the file to the NEMRC WEB server through your internet connection.
- Passive FTP : Check this option when consistent failures to backup occur, this alters the method to allow more time to perform the task.
- Floppy diskettes : Traditional backups of this type are an un-reliable option, but is okay if its the only option at the time. The backup will span multiple diskettes if needed.
- NEMRC folder>Backup : This option creates a unique file in a sub-folder of NEMRC. This data will not be recoverable if the hardware device fails due to the live data and backup data being on the same device.
- Folder you specify : This option allows you to navigate to a different location on the same device or a different device to save your backup. Thumb drives are often used as well as re-writable CD's or DVD's.
- OK : This will start the process from the selection choice made above.
- Cancel : This will exit the backup options and not perform a backup.
If done correctly, you should receive a message stating that your backup was a success.
One Entity
To backup all of your data for one entity (i.e.: school, town, village or year):
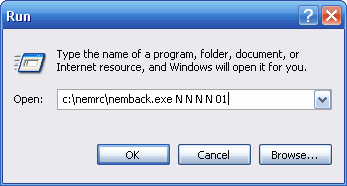
Go to the Start Menu. Choose "Run." Type the location of the NEMRC programs (most commonly "c:\nemrc\") then type "nemback.exe" and then type a space, followed by "N N N N" and then the a two-digit entity number (i.e.: 01, 03, 05, 11, 13, 15). This is case sensitive, you MUST use capitals. (Note that many towns have NEMRC running on a server - as in N:\nemrc. If so, use the drive letter and directory for NEMRC on the server)
So you should have:
Choose "OK." The following window will appear:
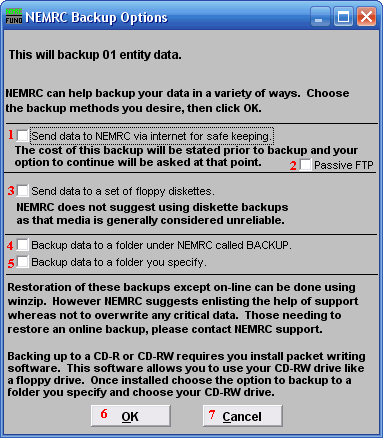
- To NEMRC via internet : Compresses data selection from above and transfers the file to the NEMRC WEB server through your internet connection.
- Passive FTP :Check this option when consistent failures to backup occur, this alters the method to allow more time to perform the task.
- Floppy diskettes : Traditional backups of this type are an un-reliable option, but is okay if its the only option at the time. The backup will span multiple diskettes if needed.
- NEMRC folder>Backup : This option creates a unique file in a sub-folder of NEMRC. This data will not be recoverable if the hardware device fails due to the live data and backup data being on the same device.
- Folder you specify : This option allows you to navigate to a different location on the same device or a different device to save your backup. Thumb drives are often used as well as re-writable CD's or DVD's.
- OK : This will start the process from the selection choice made above.
- Cancel : This will exit the backup options and not perform a backup.
If done correctly, you should receive a message stating that your backup was a success.
