
Payroll Support Document
Open as: PDF or Word Document
6. Employee Maintenance
Table of Contents
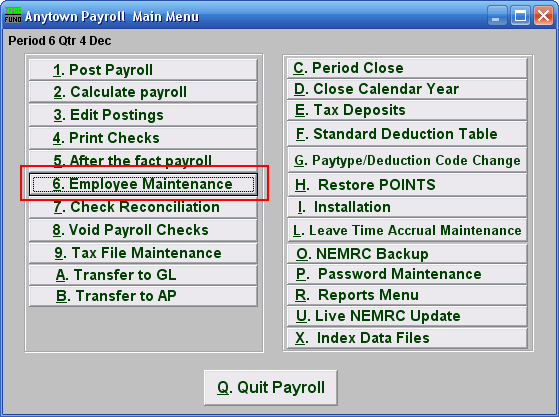
Click on "6. Employee Maintenance" from the Main Menu and the following window will appear:
Employee Maintenance
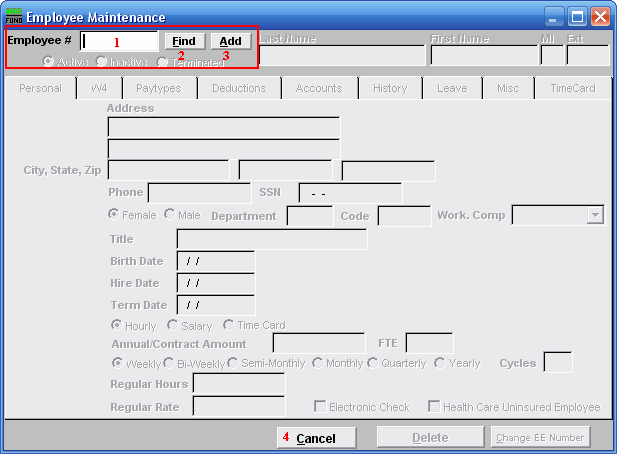
- Employee # : Type in an existing Employee Number.
- Find : Click "Find" to find an Employee from a list of Employees. For additional help with finding Employees, refer to PR GENERAL EMPLOYEE LOOKUPS.
- Add : Click "Add" to create a new Employee.
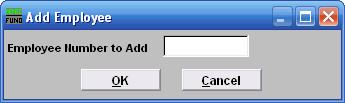
Creating a New Employee
If you chose "Add" the following window will appear:
Employee Numbers should be created in a consistent manner. Many reporting and processing options may be run based on Employee Number. While you may enter an alphanumeric code, an alpha code, based on name, will most readily generate reports in alphabetical order.
- Employee Number to Add : The Employee Number may be up to nine characters (alpha and/or numeric).
- OK : Click "OK" after you have entered the new Employee Number. This will bring up the "Personal" tab where you may begin to edit this Employee.
- Cancel : Click "Cancel" to return to the previous screen.
The "Personal" tab
Once you've chosen or created the Employee you wish to edit, the "Personal" tab will appear:
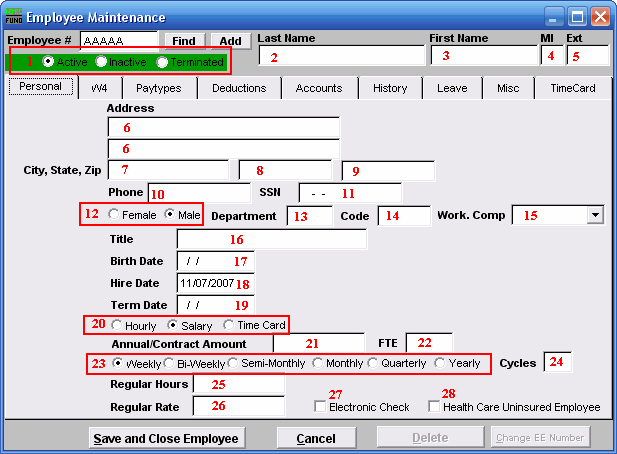
Enter the information required in each field.
- Active/Inactive/Terminated : When adding an Employee, status will default to active.
- Last Name : Enter Employee's last name, as it appears on their Social Security card.
- First Name : Enter Employee's first name, as it appears on their Social Security card.
- MI : Enter Employee's middle initial, as it appears on their Social Security card.
- Ext : Enter Employee's suffix (Jr., Sr., III, etc. - optional).
- Address : Enter Employee's address. Two fields are provided to allow for both a street address and a PO Box, or other information, as applicable.
- City, State, Zip : In the first field (7), enter the Employee's city of residence
- City, State, Zip : In the second field (8), enter the Employee's state or country (if foreign). This is a 2-letter abbreviation for state or up to ten characters for foreign country.
- City, State, Zip : In the third field (9), enter the Employee's Zip Code (up to nine digits).
- Phone : Enter Employee's phone number (including dashes, if desired).
- SSN : Enter Employee's social security number.
- Gender : Click on the appropriate gender to select it.
- Department : This is optional. You may enter up to three characters (numeric) in the Department field. Using a Department code will allow you to group Employees and process payroll (post, calculate, print checks) in batches. Many payroll reports may also be run by Department.
- Code : This is optional. You may enter up to six characters (alpha and/or numeric) in the Code field. Using Code will allow you to group Employees when running the Wage Summary Report.
- Work. Comp : Click the drop down arrow and select from the most commonly used workers' compensation codes among municipalities. After selecting a code, the following message box will appear:
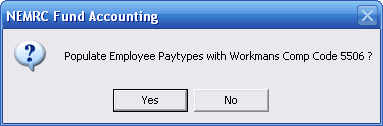
Click "Yes" to have the selected code populate the W. Comp Code field on the "Paytypes" tab. If you click "No" the W. Comp Code field in the "Paytypes" tab will not be affected. While reporting capabilities are in development, the Workers' Compensation field is currently available for information only. - Title : Enter an Employee's job title.
- Birth Date : Enter an Employee's birth date (xx/xx/xxxx).
- Hire Date : This field will default to the current date. You may change this date if needed. (xx/xx/xxxx).
- Term Date : Enter a termination date, if applicable.
- Hourly/Salary/Time Card : Click on the basis which this Employee's wages will be determined.
- Annual Contract Amount : This is optional. For salaried Employees, entering an Annual Contract Amount will automatically generate Regular Hours (based on a 40-hour week) and Regular Rate (Annual Contract Amount/Regular Hours). This information may be changed if necessary. For hourly Employees, the Annual Contract Amount field is available for information only, and doesn't affect anything.
- FTE : Full Time Equivalent value for this Employee. This is used for both educational institutions and for VT Catamount Health reporting.
- Pay Cycles : Click to select the frequency at which this Employee will be paid (weekly, biweekly, etc.).
- Cycles : The number of pay cycles/pay periods will be determined automatically, based upon the frequency you selected. This may be changed manually.
- Regular Hours : For hourly Employees, enter the number of standard hours the Employee is expected to work during a pay cycle (not to include overtime). This information will appear in the payroll posting process. Salaried Employees will default to a 40-hour week and regular hours will be based on the pay cycle selected, although this information may be changed manually.
- Regular Rate : For hourly Employees, enter hourly rate. For salaried Employees, enter gross wages per pay period (if you have entered an Annual Contract Amount for a salaried Employee, Regular Rate will be calculated automatically).
- Electronic Check : If the Employee is paid via direct deposit, the Electronic Check field must be checked and a deduction must be established (100% net deduction). Refer to the "Deductions" tab.
- Health Care Uninsured Employee : Check this box if an Employee is not covered by any form of health insurance. This will be used as part of the VT Catamount Health reporting.
The "W4" tab
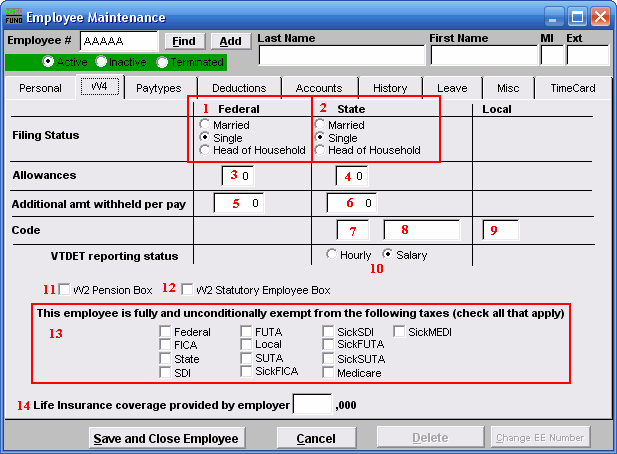
Each Employee must complete and sign an IRS Form W-4. The following data should be entered in the W4 screen, based on information provided by the Employee in the Form W-4.
- Filing Status (Federal) : Click on the option that indicates the Employee's federal filing status. Filing status is used to determine tax filling requirements. For further information, refer to www.irs.gov, [Publication 501].
- Filing Status (State) : Click on the option that indicates the Employee's state filing status. For further information regarding Vermont filing status, refer to www.state.vt.us/tax. For other states, please refer to the applicable state tax website. Reference Form W-4VT? Vermont filing status is often the same as Federal, with some exceptions, such as filing status for civil unions.
- Allowances (Federal) : Enter the number of federal allowances/exemptions claimed by Employee. Allowances will be used to determine federal income tax withholdings. For further information, refer to www.irs.gov and/or form W-4.
- Allowance (State) : Enter the number of sate allowances/exemptions claimed by Employee. Allowances will be used to determine state income tax withholdings. For further information, refer to www.state.vt.us/tax.
- Additional amt withheld per pay (Federal) : Enter the additional amount to be withheld for federal income tax, as claimed by Employee. For further information, refer to www.irs.gov and/or form W-4.
- Additional amt withheld per pay (State) : Enter additional amount to be withheld for state income tax, as claimed by Employee. For further information, refer to www.state.vt.us/tax.
- Code (State) : In the first State Code field, enter the 2-letter abbreviation for the Employee's state of residence. This information will be used to determine which state tax table to use for payroll calculations.
- Code (State) : The second State Code field may be used for tax routines specific to certain states. Enter data as applicable.
- Code (Local) : In the Local Code field, enter the user-defined local tax code, if applicable. This code may be linked to a tax table for site-specific payroll calculation purposes.
- VTDET reporting status : This is for Vermont sites only. This field will initially default to the reporting status entered in the "Personal" tab. This information is used for reporting to the Vermont Department of Employment and Training (prcus35).
- W2 Pension Box : Check this box if the Employee is contributing to any retirement system.
- W2 Statutory Employee Box : Some workers are deemed to be Employees by statute, although this is generally not the case with new municipal Employees. For further information, refer to www.irs.gov.
- This Employee is fully and unconditionally exempt from the following taxes : Proceed with CAUTION when establishing tax exemptions in the "W4" tab. Checking these boxes will prevent withholding and reporting for associated wages. Reporting and deduction options are also available by Paytype. Exemptions entered in the "W4" tab will override entries made in the "Paytype" tab.
- Life Insurance coverage provided by employer : Enter the value of life insurance provided to the Employee. This information will be used, if applicable, for W-2 reporting purposes.
The "Paytypes" tab
Click on the "Paytypes" tab, and the following window will appear:
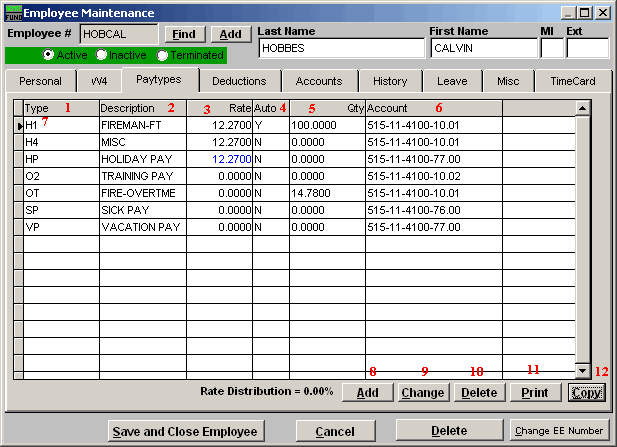
- Type : This column will show the pay type codes that have been assigned to this Employee.
- Description : This column will show the pay type descriptions that have been assigned to each code for this Employee.
- Rate : This column will show the pay rate that has been assign for each pay code when it is defined as a flat calculation.
- Auto : This column will show a 'Y' if the pay code should automatically appear when posting this Employee during a pay period.
- Qty : This column will show the percentage amount that has been assigned for each pay code when it is defined as a rate calculation.
- Account : This column will show the related account assigned to the pay code when payroll is linked to the general ledger.
- Selector : While a type is selected, you may click "Change" or "Delete."
- Add : Click "Add" to create a new Paytype. The following screen below will appear.
- Change : Click "Change" to edit the selected Paytype. The Edit Paytypes screen found later in this document will appear.
- Delete : Click "Delete" to delete the selected Paytype.
- Print : Click this button to print. Refer to the "Print Paytypes" section below for additional information.
- Copy : Click this button to copy Paytypes from another Employee to this one. Refer to the "Copy Paytypes" section below for additional information.
Add a Paytype
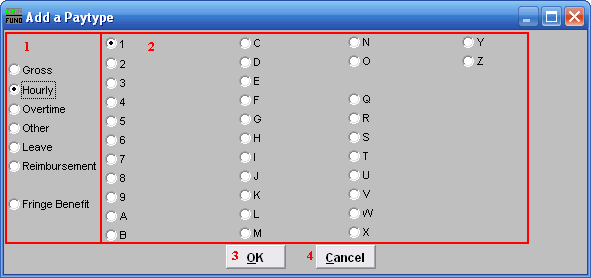
- This is the type of Paytype.
- The number/letter value to be assigned to this Paytype. The numbers/letters available will differ depending on which Paytype is chosen.
- OK :Click "OK" to create this Paytype, the following screen will appear.
- Cancel :Click "Cancel" to return to the previous screen.
Change Paytypes
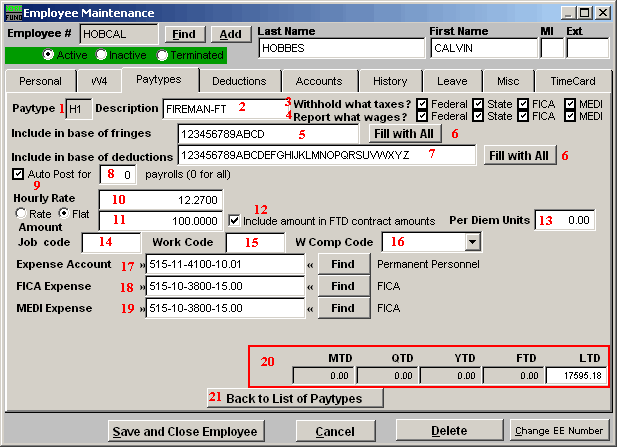
- Paytype : New salaried Employees, as designated in the "Personal" tab, will first appear with a G1 (gross/salary) Paytype. New hourly Employees will first appear with a H1 (hourly) Paytype.
- Description : Enter a user defined description of the Paytype, up to 22 characters.
- Withhold what taxes? : Click to check or uncheck the boxes. A Checked box means that those taxes are to be withheld for this Employee, for this Paytype.
- Report what wages? : Click to check or uncheck the boxes. A Checked box means that those wages will be reported for this Employee, for this Paytype.
- Include in base of fringes : Indicate which fringes should be calculated against this paytype. This only impacts fringe calculations based on a percentage calculation.
- Fill with All : Clicking on this will populate the field will all values possible.
- Include in base of deductions : ndicate which deductions should be taken against this paytype. This only impacts deductions calculations based on a percentage calculation.
- Auto post for : Clicking Auto Post will allow this paytype to be posted automatically for the pay periods indicated (0 for all).
- Rate OR Flat : Click "Rate" if this Employee is being paid at an hourly rate, or "Flat" if this Employee is being paid a salary rate.
- Amount :
- If you chose "Rate," then enter the number of standard hours (not including overtime) that this Employee is expected to be working each pay period. Hours may be changed at Posting.
- If you chose "Flat," then enter the rate as a percentage (50.0 = 50%, 100.0 = 100%) and that percentage will be applied to the Regular Rate reflected in the "Personal" tab.
- Rate or Flat : Select the option of determining the default posting amounts as a rate of the default regular hours/pay on the personal tab or a flat amount of hours/pay to post
- Include amount in FTD contract amounts : Indicate whether wages should be included in the calculation of fiscal-to-date contract amounts.
- Per Diem Units : This defines the number of hours to report to VT Catamount Health with the paytype is use as a per diem rate. This is commonly found in educational institutions.
- W Comp Code : Select the workers' compensation code that most closely reflects the Employee's responsibilities for this paytype. The drop-down menu allows you to select from the most commonly used workers' compensation codes among municipalities. This field may be populated automatically, from the "Personal" tab, but may be overwritten here. While reporting capabilities are in development, the Workers' Compensation field is currently available for information only.
- Expense Account : Enter the account number for the General Ledger expenditure account to which this Paytype will be posted.
- FICA Expense : Enter the account number for the General Ledger expenditure (NOT liability) account to which FICA will be posted.
- MEDI Expense : Enter the account number for the General Ledger expenditure (NOT liability) account to which Medi will be posted.
- Amount "to date" : This shows the amount for this paytype distributed calendar year to date.
- Back to list of Paytypes : Click this to return the starting list of paytypes.
Print Paytypes
If you click "Print" from the Paytypes tab, the following window will appear:

- PreView : Click this button to preview. Refer to GENERAL PREVIEW for more information.
- Print : Click this button to print. Refer to GENERAL PRINTING for more information.
- Print Compressed : Click this button to print the report. This is different from the "Print" option in that it will use less paper for the same report.
- File : Click this button to save on this computer. Refer to GENERAL FILE for more information.
- Cancel : Click "Cancel" to cancel and return to the Paytypes tab.
Copy Paytypes
If you click "Copy" from the Paytypes tab, the following window will appear:
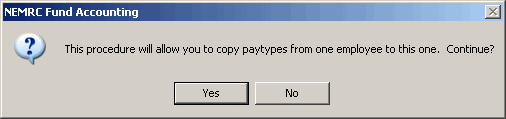
Click "Yes" to continue, or "No" to return to the Paytypes tab. If you click "Yes" the follow window will appear:

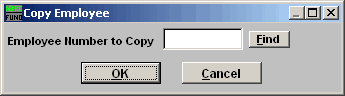
Enter the Employee Number who has the Paytypes you wish to copy,or click "Find" to select from the list. All Paytypes will be copied, and will appear in the Paytypes list.
The "Deductions" tab
Click on the "Deductions" tab, and the following window will appear:

- # : This column shows the deduction sequence numbers that have been assigned to this Employee.
- Description : This column shows the deduction description assigned for each deduction on this Employee.
- Standard : This column shows the code from the standard deduction table if the deduction is linked to that table.
- Amount : This column shows the flat amount or percentage assigned to this deduction.
- Direct : This column will show a 'Y' if the deduction is part of a direct deposit process.
- Add : Click this button to add a new deduction to this Employee. The "Add a Deduction" screen found below will appear.
- Change : Select a deduction from the table then click this button to edit the settings on that deduction for this Employee.
- Delete : Select a deduction from the table then click this button to delete the deduction for this Employee. This option is only allowed if there has been no activity for the last two calendar years.
- Print : Click this button to print. Refer to the "Print Deductions" section below for additional information.
- Copy : Click this button to copy Paytypes from another Employee to this one. Refer to the "Copy Deductions" section below for additional information.
Add a Deduction
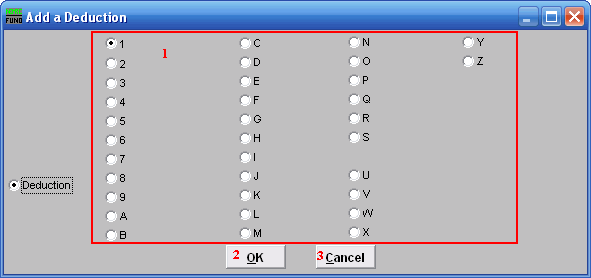
- Choose the number or letter to be used for this deduction. Be consistent. The best practice is to establish your own standards to assign deduction sequence numbers. The following is an example of organization:
Sequence codes 1 through 5 are all tax exempt like:- Section 125 Health
- Section 125 Dental
- Section 125 Dependant Care
- Section 125 Disability when qualified.
- Available for an other tax exempt
- Municipal Retirement
- Teachers Retirement
- Annuity Deduction other
- Annuity Deduction other
A. Health Ins
B. Dental Ins
C. Disability
D. Member Dues
Y. Direct Deposit for a Flat Amount
Z. Direct Deposit 100% of Net Pay - OK : Click "OK" to create this Deduction, the following screen will appear.
- Cancel : Click "Cancel" to return to the previous screen.
Add or Edit Deduction Details
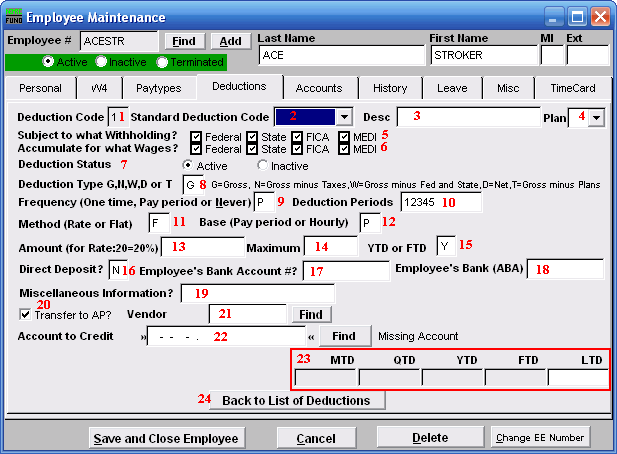
- Deduction Code : Shows the deduction sequence code being worked on.
- Standard Deduction Code : This allows selecting a link to a standard deduction table for default values to the balance of the fields on this screen. The standard table is maintained from the Main Menu.
- Desc : Enter a description for this deduction if not linked to the standard table.
- Plan : If the deduction is tax deferred and is part of an IRS qualified plan then use the drop down to select the appropriate plan letter. The vendor/representative/CPA firm can help determine if it is qualified.
- Subject to what withholding? : Click to check or uncheck the boxes. A Checked box means that those taxes are to be withheld for this Employee, for this deduction.
- Subject for what wages? : Click to check or uncheck the boxes. A Checked box means that those wages will be reported for this Employee, for this deduction.
- Deduction Status : Click the option to make the deduction active or inactive.
- Deduction Type : Enter the appropriate code letter to define the calculation values to use.
- "G" is the most common that deductions are calculated on all pay.
- "D" is the next most common because of 100% of Net pay direct deposits.
- "N" is for Gross pay minus all taxes (FWT, SWT, FICA, MEDI and Local.)
- "W" is for Gross pay minus federal and state taxes (FWT & SWT.)
- "T" is for Gross pay minus any deductions with qualified plans defined.
- Frequency : Enter the appropriate code letter to define posting rules.
- "O" is used for a one time deduction that will be inactivated after used.
- "P" is used to have the deduction post for pay periods define in #10.
- "N" is used to turn off the deduction all together.
- Deduction periods : Enter the periods to call for this deduction during posting. If pay cycles are as frequent as weekly then it is possible to have five pat periods. Values of 1 through 5 indicate to take this deduction in months with a fifth pay cycle in them.
- Method : Enter the appropriate code letter to define the method of calculation.
- "F" is used for a flat, constant amount to withhold.
- "R" is used to calculate a percentage in combination with the deduction type field.
- Base : Enter the appropriate code letter to define the method of calculation.
- "P" is most common and does not consider the hours worked as a multiplier.
- "H" is used when a deduction calculation included the hours worked as a factor.
- Amount : Enter the flat amount in dollars or the percentage amount based on the method in item 11.
- Maximum : Enter the maximum amount to withhold or leave zero if there is not one.
- YTD or FTD : If there is a maximum then determine if this test is based on "Y" calendar year to date or "F" fiscal year to date.
- Direct Deposit : Enter "Y" of this deduction is to be processed as a direct deposit. Enter "N" if it is not.
- Employee's Bank Account : Enter the Employees bank account number if this is a direct deposit deduction.
- Employee's Bank (ABA) : Enter the ABA number for Employee's bank. Maintain a list of ABA numbers used to simplify/cross check the ones provided by the Employee. Some financial institutes have a different ABA number for electronic activities.
- Miscellaneous Information? : Enter a "C" for checking and "S" for savings when a deduction is used for direct deduction. Otherwise this is user defined.
- Transfer to AP : Enter "Y" to transfer this deduction to accounts payable. If this is a direct deposit deduction processed electronically this should be "N."
- Vendor : Enter the vendor code for this deduction if transferring to accounts payable.
- Account to Credit : Enter the reference account when linked to the general ledger. This is commonly a liability. This would be the cash account for direct deposit
- Amount "to date" : These field display the amounts withheld to date.
- MTD = Month to Date
- QTD = Quarter to Date
- YTD = Calendar Year to Date
- FTD = Fiscal Year to Date
- Back to List of Deductions : Click this button to return to the deduction list for this Employee.
Print Deductions
If you click "Print" from the Deductions tab, the following window will appear:

- PreView : Click this button to preview. Refer to GENERAL PREVIEW for more information.
- Print : Click this button to print. Refer to GENERAL PRINTING for more information.
- Print Compressed : Click this button to print the report. This is different from the "Print" option in that it will use less paper for the same report.
- File : Click this button to save on this computer. Refer to GENERAL FILE for more information.
- Cancel : Click "Cancel" to cancel and return to the Paytypes tab.
Copy Deductions
If you click "Copy" from the Deductions tab, the following window will appear:

Click "Yes" to continue, or "No" to return to the Paytypes tab. If you click "Yes" the follow window will appear:
Enter the Employee Number who has the Paytypes you wish to copy or click "Find" to select from the list. All Paytypes will be copied, and will appear in the Paytypes list.
The "Accounts" tab
Click on the "Accounts" tab, and the following window will appear:

- Net (Checking) Account : Enter the reference account for net pay to post when linked to the General Ledger.
- Tax Expense Account : Enter the default tax expense account for this Employee to use when adding paytypes.
The "History" tab
Click on the "History" tab, and the following window will appear:
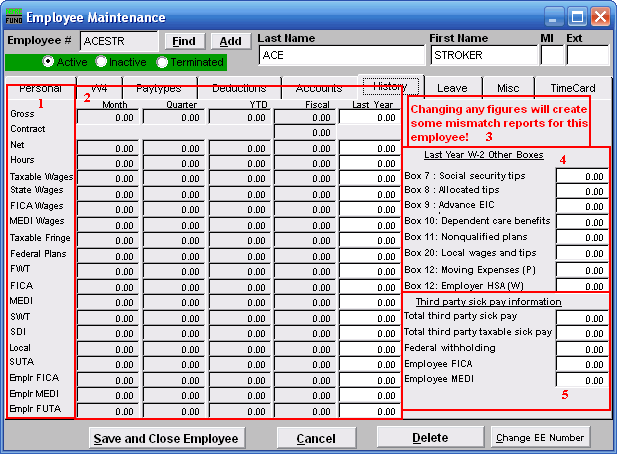
- This column shows the labels for the values in #2.
- These are the amounts "to date" as well as the total amount from last year.
- Make sure to read this notice.
- Last Year W-2 Other boxes : Values entered here will appear in W-2 processing and reporting.
- Third party sick pay information : Values entered here will appear in W-2 processing and reporting.
The "Leave" tab
Click on the "Leave" tab, and the following window will appear:
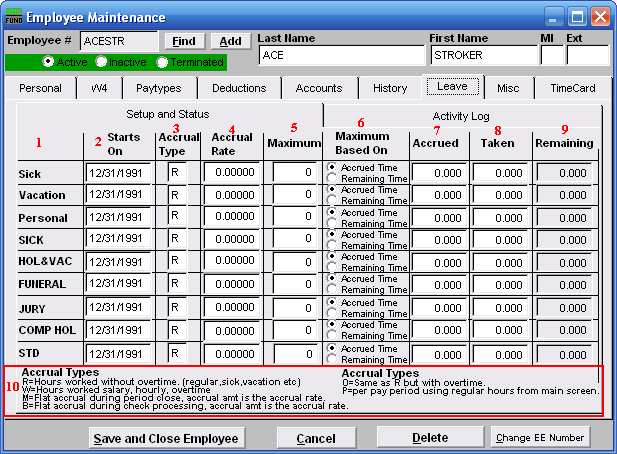
- This column labels the different types of leave time. The last six are user defined labels found in Installation set up on the Main Menu.
- Starts On : Enter the starting date for each leave time to begin accrual according to your policies.
- Accrual Type : Enter the appropriate letter code for the calculation method as defined in item 10.
- Accrual Rate : Enter the rate in hours to accrue according to your policies.
- Maximum : Enter the maximum number of hours allowed according to your policies.
- Maximum Based On : The test for reaching the maximum is determined with this setting.
- Accrued : This value is the amounts that have been accrued since the last reset according to your policy.
- Taken : This value is the amounts that have been used/taken since the last reset according to your policies.
- Remaining : This value is calculated from Accrued minus Taken.
- Accrual Types : The letter codes define the methods used to calculate with the accrual rate for additional benefit time.
The "Misc" tab
Click on the "Misc" tab, and the following window will appear:
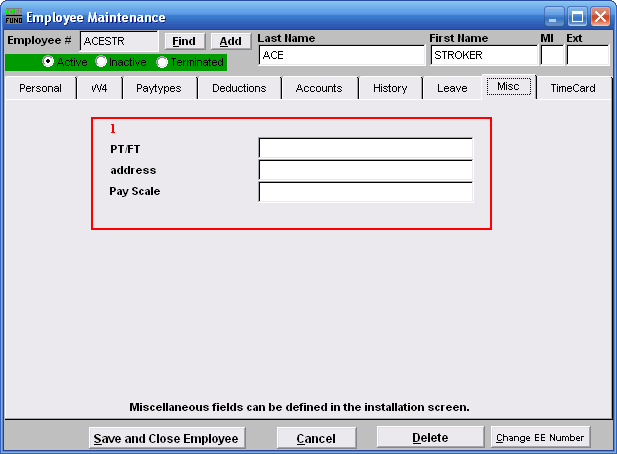
- These fields may be defined in "I. Installation," off the Main Menu, under the "General" tab. The capacity is ten fields of twenty characters.
The "TimeCard" tab
Click on the "TimeCard" tab, and the following window will appear:

- Rate Code : Enter 1 to 4 character values to represent the time card system.
- Pay Rate : Enter the pay rate for this Employee next to each rate code.
- Save and Close Employee : Click this button to save all changes and close the Employee record.
- Cancel : Click this button to not save any changes and close the Employee record.
- Delete : Click this button to delete this Employee record. This option is not available when there is any history values for the last two calendar years.
- Change EE Number : Click this button to change the Employee number. This is used when Employee numbers are also name related and an individuals name has changed.
