
Payroll Support Document
Open as: PDF or Word Document
F. Standard Deduction Maintenance
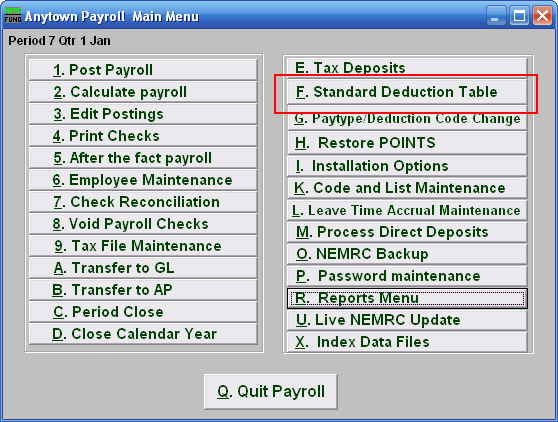
Click on "F. Standard Deduction Table" from the Main Menu and the following window will appear:
Standard Deduction Table

- Description: This column lists the descriptions defined by the user.
- Code: This column lists the code defined by the user.
- Amount: This field lists the rate or flat amounts assigned to the code.
- Add: Click this button to Add a new Deduction Code. Refer to the "Add/Change" section below.
- Change: Click this button to change the selected Deduction Code. Refer to the "Add/Change" section below.
- Delete: Click this button to delete the selected Deduction Code.
- Report: Click this button to choose an output option for a list of Deduction types. Refer to the "Output" section below.
- OK: Click "OK" to save changes and return to the Main Menu.
- Cancel: Click "Cancel" to cancel and return to the Main Menu.
Add/Change
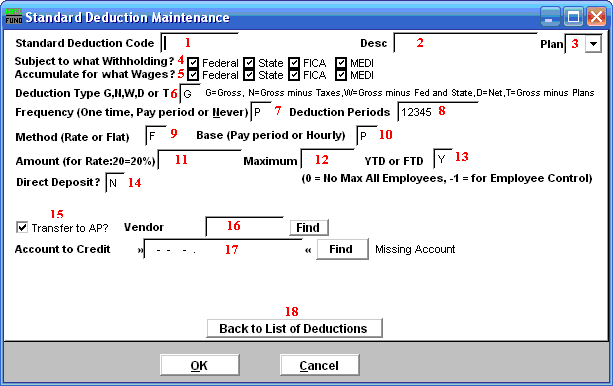
- Standard Deduction Code: Define a code to be used in the deduction screen of "6. Employee Maintenance" in the "Deduction" tab. Consider a pattern of codes that assist in determining the deduction sequence number to link with. The example in the listing above is associated in the manner where the first position indicates with which sequence number to link. Additionally the code continues to indicate health plan chosen and number of benefactors. J, F or P plan and single (01), couple (02) or family (FM) allow distinct reporting on the deductions. Each employee can only be a member of one of these unique code examples for deduction sequence 1.
- Desc: Enter a description for this deduction.
- Plan: If the deduction is tax deferred and is part of an IRS qualified plan then use the drop down to select the appropriate plan letter. The vendor/representative/CPA firm can help determine if it is qualified.
- Subject to what withholding?: Click to check or uncheck the boxes. A checked box means that those taxes are to be withheld for any Employee with this deduction.
- Accumulate for what wages?: Click to check or uncheck the boxes. A checked box means that those wages will be reported for any Employee with this deduction.
- Deduction Type: Enter the appropriate code letter to define the calculation values to use.
"G" is the most common that deductions are calculated on all pay.
"D" is the next most common because of 100% of Net pay direct deposits.
"N" is for Gross pay minus all taxes (FWT, SWT, FICA, MEDI and Local.)
"W" is for Gross pay minus federal and state taxes (FWT & SWT.)
"T" is for Gross pay minus any deductions with qualified plans defined. - Frequency: Enter the appropriate code letter to define posting rules.
"O" is used for a one time deduction that will be inactivated after used.
"P" is used to have the deduction post for pay periods define in item 8.
"N" is used to turn off the deduction all together. - Deduction Periods: Enter the periods to call for this deduction during posting. If pay cycles are as frequent as weekly then it is possible to have five pay periods. Values of 1 through 5 indicate to take this deduction in months with a fifth pay cycle in them.
- Method: Enter the appropriate code letter to define the method of calculation.
"F" is used for a flat, constant amount to withhold.
"R" is used to calculate a percentage in combination with the deduction type field. - Base: Enter the appropriate code letter to define the method of calculation.
"P" is most common and does not consider the hours worked as a multiplier.
"H" is used when a deduction calculation included the hours worked as a factor. - Amount: Enter the flat amount in dollars or the percentage amount based on the method in item 9. When the flat amount is left as zero then each employee can be set to their own value in Employee Maintenance.
- Maximum: Enter the maximum amount to withhold or leave zero if there is not one.
- YTD or FTD: If there is a maximum then determine if this test is based on "Y" calendar year to date or "F" fiscal year to date.
- Direct Deposit: Enter "Y" of this deduction is to be processed as a direct deposit. Enter "N" if it is not.
- Transfer to AP?: Check this box to get the deduction to produce an automated invoice for Accounts Payable.
- Vendor: Enter the vendor code for this deduction if transferring to Accounts Payable.
- Account to Credit: Enter the reference account when linked to the General Ledger. This is commonly a liability. This would be the cash account for direct deposit.
- Back to List of Deductions: Click this button to return to the Deduction table.
Output
After clicking "Report" the following window will appear:

- PreView: Click this button to preview this report. Refer to GENERAL PREVIEW for more information.
- Print: Click this button to print this report. Refer to GENERAL PRINTING for more information.
- Print Compressed: Click this button to print the report. This is different from the "Print" option in that it will use less paper for the same report.
- File: Click this button to save this report on this computer. Refer to GENERAL FILE for more information.
- Cancel: Click "Cancel" to cancel and return to the Main Menu.
