
Voter Checklist Support Document
Open as: PDF or Word Document
R. Reports Menu: 5. Voter Labels
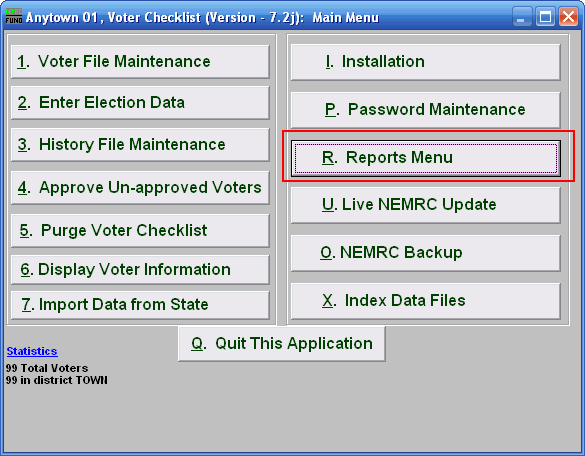
Click on "R. Reports Menu" from the Main Menu and the following window will appear:
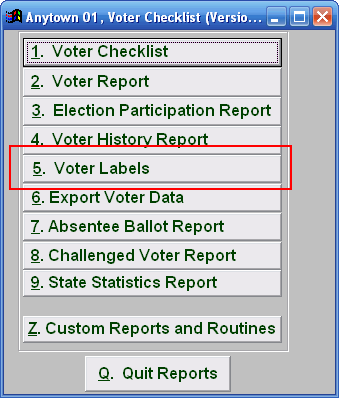
Click on "5. Voter Labels" from the Reports Menu and the following window will appear:
Voter Labels
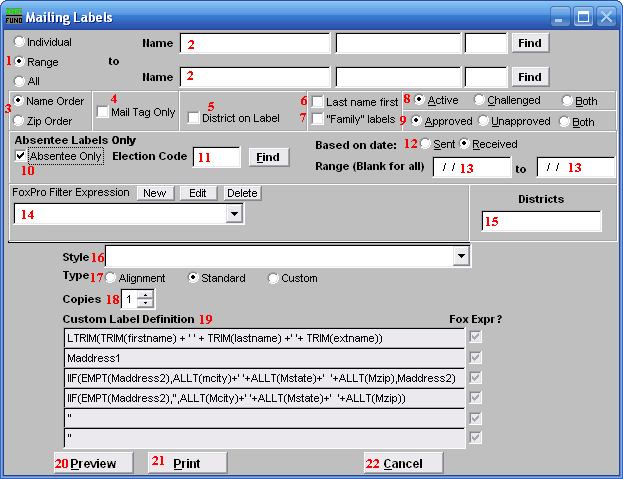
- Individual OR Range OR All: Select whether this report is for an Individual, Range of, or All voters.
- Name: These fields are only available if you selected "Individual" or "Range" for item 1.
- Enter the voter's name and click "Find" to select the Voter to report on (if "Individual" was selected), or the Voter to start on (if "Range" was selected). If "Range" was selected, do the same for the Voter to end on.
- Name OR Zip Order: Select whether this report will print in order of Last name or Zip code.
- Mail tag Only: Check to have only the Mail tag appear on this report.
- District on Label: Check to include the District each voter is from on the label.
- Last Name first: Check to have the Voters' last names first.
- "Family" labels: Check to have the system create a single label for each unique last name and address combination.
- Active OR Challenged OR Both: Select whether this report will include Active or Challenged voters, or Both.
- Approved OR Unapproved OR Both: Select whether this report will include Approved or Unapproved voters, or Both.
- Absentee Only: Check to include only absentee voters in this report.
- Election Code: Enter the election code for the election that this report will be on, or click "Find" and select from there.
- Based on Date: Select whether the report will print based on the date the absentee ballot was sent, or the date it was received.
- Range: Enter the date range based on the choice in item 12.
- FoxPro Filter Expression: A conditional reporting expression developed with NEMRC support. This evaluates account information to determine if the account should be included. Contact NEMRC support to learn more about this option.
- Districts: Enter the district code or codes for selection of labels.
- Style: Click on the drop down arrow and choose the style of label that you want.
- Type:
Alignment: This option outputs sample placement of data based on the Style form selected above.
Standard: Labels using the same method as bill printing where data from "6. Account Maintenance," in the "Mail-To" tab is used. If the "Mail-To" tab is not filled in, then the data in the "General" tab is used for mailing addresses.
Custom: User defined content on the label. - Copies: Determine how many of each label you would like generated. This can be used for a mailing label, return address label and notice label in a three piece mailing.
- Custom Label Definition: Call NEMRC for details on how to achieve what you are looking for on the labels.
- Preview: Click this button to preview. Refer to GENERAL PREVIEW for more information.
- Print: Click this button to print. Refer to GENERAL PRINTING for more information.
- Cancel: Click "Cancel" to cancel and return to the Reports Menu.
